Triggered Audio Player
06/26/2017
DFPlayer Mini
Are you looking for an audio trigger? Audio that will trigger and play a music, a song, voice instructions based on a relay trigger or by the use of an Arduino program? What’s nice about this product is that you don’t need to use an Arduino or any other type of microcontroller.
This DFPlayer is a very cheap and easy solution. About $5 a board on Amazon if you buy 5 at a time. It has a 3W output for speakers, low output for amplified speakers or headphones. It has pins to increase/decrease the volume and pins to skip to the next audio file. Audio files are stored on a micro SD card.
For detailed specs on this product see www.dfrobot.com.
Figure 1-1 depicts the pins (credit www.dfrobot.com).
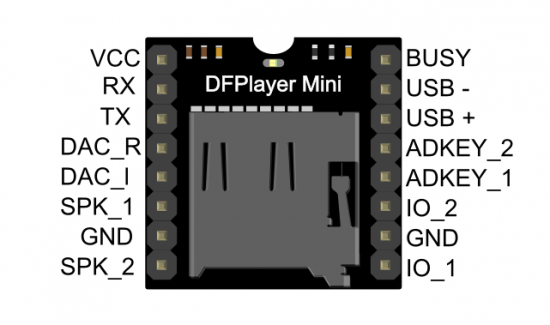
Figure 1-1
Figure 1-2 depicts detailed information about each pin (credit www.dfrobot.com).
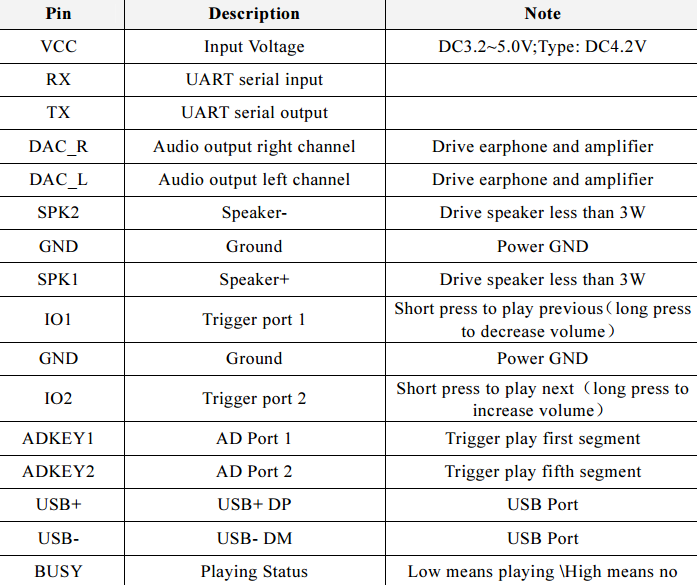
Figure 1-2
The following pins can be used to trigger audio without an Arduino.
The VCC and GND pins on the right depict the power input. We are using a 3.5vdc wall wart. The SPK_1 and SPK_2 pins are connected to a speaker.
The IO_2 and GND pins on the left trigger the audio. When these wires are connected, briefly (via relay or momentary switch), the audio board triggers and starts playing file 0001.mp3 and contiues to play all audio files on the micro SD card.
We like to use LED Pixel light connectors to make our gadgets plug and play and to allow them be swapped out in case of failure.
We like to use breadboard jumper wires (the female ends) to connect to the pins of the circuit board. The wires fits nicely on the pins and allow easy configuration. We will sometimes hot glue the wires into position once things are tested successfully. For those gadgets that are enclosed inside a stable enclosure, we don’t even bother to secure them permanently. This allows us to swap just the board, if it goes bad.
When not using an Arduino to control the triggering of the audio board, you can momentarily connect the GND pin with either the IO_1 or IO_2 pins. A brief connection will start playing audio file 0001.mp3. A longer connection from GND to IO_1 will cause a decrease in volume. A longer connection from GND to IO_2 will increase volume. The small/tiny LED light on the front of the board will light and blink when the audio track is playing. If the board goes bad (you smoke the circuit board), you won’t get any output to the speakers. See Gothca’s below.
Parts
DFPlayer Mini (Amazon) 5x for $16 (Can’t beat this deal)
3 pin JST SM Male Female connectors (Pixel light connectors) (Amazon)
Breadboard Jumper Wires (Amazon)
Arduino Library https://github.com/DFRobot/DFRobotDFPlayerMini
Gotcha’s
The circuit board isn’t very forgiving when you apply too much power to the inputs or to the wrong pins. Be careful to make sure you have the proper pins wired with the correct voltage before applying power.
Read the instructions on using the micro SD card. The audio files must reside in a subdirectory called mp3 and audio files must start with a 4 digit numbering scheme, i.e. 0001.mp3, 0002.mp3.....0255.mp3.