MIDI Key Sequence Puzzle
05/27/2017
We wanted to triggered a magnetic lock upon a sequence of ordered keys played on a MIDI keyboard.
An Arduino was used to hold the logic that would keep track of a n number of keystrokes played, in order. If a keystroke was missed, the sequence would have to be played over, from the beginning to satisfy the program/puzzle.
Initially, we thought the circuit for reading MIDI input would be easy. But after several attempts at trying to create a stable circuit, one was purchased. If you wish to build a circuit, there are some instructable on other blogs that can give you a head start.
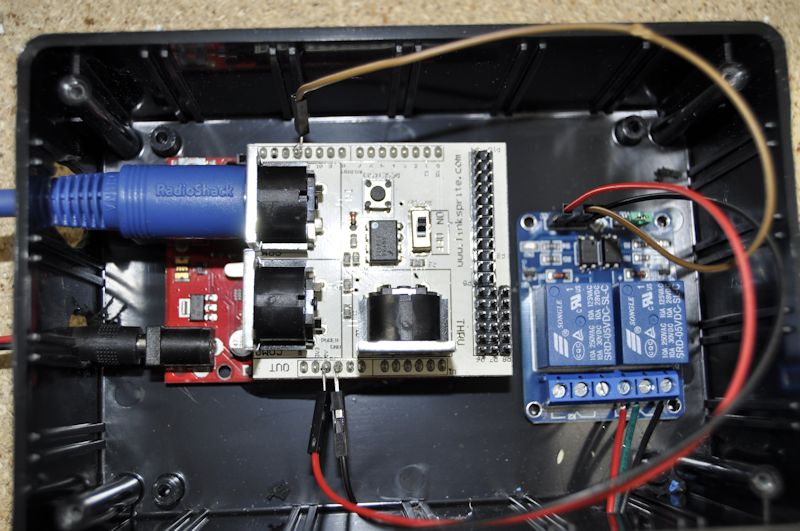
A MIDI shield for the Arduino was purchased to accomplish the goal of receiving MIDI input from a keyboard. Another purchase that was of considerable value was a USB IN/OUT MIDI cable converter that allowed a connection to the music keyboard to a PC to validate the data coming from the device. An open source program called MIDI-OX was used to actually view input (actual data - bits and bytes) coming from the device.
The Arduino MIDI Library was used to handle the low level interaction with the Arduino and the MIDI shield. All that was needed was some simple program logic to keep track of keys played in proper order. Once the order is satisfied, a signal is send to a relay board.
The puzzle/setup is used to release a magnetic lock for a door that needs to be opened. The magnetic lock is controlled by a 12vdc power supply. We connect one of the 12vdc wires that goes to the magnetic lock to the normally closed (NC) pole of the relay. This allows power to flow through to the lock so that the lock says engaged (energized, locked) until the puzzle is solved.
The Arduino program continuously (loop) reads the input from the MIDI device. It keeps track of the next key that needs to be played. If the input doesn’t match the expected key, the program resets and looks for the initial keystroke (sequence tracking starts over). Once all keystrokes are played in order, without mistake, the relay is energized and the connection to the magnetic lock is cut when the circuit goes from a normally closed (NC) state to a normally open (NO) state. The relay is energized for a good period of time, 1 hour, to insure the lock doesn’t reengage. When the room is reset, power to all of the props is reset, resetting the Arduino and it’s program.
Parts List
MIDI Shield for Arduino (Amazon) (or Amazon
)
VicTsing USB IN-OUT MIDI Cable Converter PC to Music Keyboard Adapter Cord (Amazon)
SHIELDED MIDI CABLE SET (Amazon)
Trials and Tribulations
As mentioned, a MIDI circuit was harder to get working than expected. One thing that contributed to this was that the MIDI keyboard that was used initially wasn’t outputting signals. This wasn’t caught for some time. Not until the USB MIDI Cable Converter along with the MIDI-OX software was used to simulate MIDI output.
MIDIPlus AK490 MIDI Keyboard Controller was purchased from Amazon and didn’t output MIDI signals as was expected. This keyboard was returned and replaced with a garage sale purchased keyboard.
MIDI keys pressed on the keyboard send a KEY ON and KEY OFF events for each key. A value for Channel, Pitch, and Velocity is also sent. The data has to be evaluated to determine what key was pressed and whether it was an ON or OFF event. Again, the MIDI-OX software allowed us to debug actual signals (values) from the keyboard.
The MIDI Shield caused some inconvenience since it uses one of the PINs needed to upload a new version of the program to the Arduino. It had to be disconnected prior to upload then reconnected.
The Relay Board was not a stackable shield. It would have been nice to be able to stack both shields on top of the Arduino.
Code
#include   // Add Midi Library

#define RELAY 12    // Relay pin
#define LED 13      // Arduino Board LED is on Pin 13
#define NOTE_CNT 9  // Number of notes to be played

int YELLOW_KEY = 0x3E;
int RED_KEY = 0x43;
int BLUE_KEY = 0x47;
int GREEN_KEY = 0x4A;

int keyArray[NOTE_CNT] = {RED_KEY, YELLOW_KEY, RED_KEY, YELLOW_KEY, RED_KEY, YELLOW_KEY, RED_KEY, BLUE_KEY, GREEN_KEY}; // this is the order of notes that need to be played
int keyPressedArray[NOTE_CNT] = {0, 0, 0, 0, 0, 0, 0, 0, 0};

// Below is my function that will be called by the Midi Library
// when a MIDI NOTE ON message is received.
// It will be passed as bytes for Channel, Pitch, and Velocity
void MyHandleNoteOn(byte channel, byte pitch, byte velocity)
{

  // A NOTE ON message with a velocity = Zero is actualy a NOTE OFF
  if (velocity == 0)
  {
    digitalWrite(LED,LOW); //Turn LED off
    return;
  }

  int nextKeyPos = -1;
  for (int i = 0; i < NOTE_CNT; i++)
  {
    if (keyPressedArray[i] == 0) // This is the next note that needs to be played
    {
      nextKeyPos = i;
      break;
    }
  }

  // If we found the next note that needs to be pressed
  if (nextKeyPos > -1)
  {
    if (MIDI.getData1() == keyArray[nextKeyPos])
    {
        keyPressedArray[nextKeyPos] = 1; // Indicate this note has been played
        digitalWrite(LED,HIGH);  //Turn LED on
        delay(100);
        digitalWrite(LED,LOW);  //Turn LED off
    }
    else
    {
        // Reset, start over
        for (int i = 0; i < NOTE_CNT; i++)
        {
          keyPressedArray[i] = 0;
        }
    }
  }


  // Let's see if all of the notes were played, in order
  int pressedKeys = 0;

  for (int i = 0; i < NOTE_CNT; i++)
  {
    pressedKeys += keyPressedArray[i];
  }

  // If all notes were played, let's trigger the relay
  if (pressedKeys == NOTE_CNT)
  {
    digitalWrite(LED,HIGH);    //Turn LED on
    digitalWrite(RELAY, LOW);  //Turn on relay

    delay(300000); // --- 5 min

    // Reset
    digitalWrite(LED, LOW);     //Turn LED off
    digitalWrite(RELAY, HIGH);  //Turn off relay

    // Reset, start over
    for (int i = 0; i < NOTE_CNT; i++)
    {
      keyPressedArray[i] = 0;
    }
  }
}

void setup()
{
   digitalWrite(RELAY, HIGH);   //Turn off relay
   pinMode(RELAY, OUTPUT);

  pinMode (LED, OUTPUT); // Set Arduino board pin 13 to output
  MIDI.begin(MIDI_CHANNEL_OMNI); // Initialize the Midi Library.

  // OMNI sets it to listen to all channels.. MIDI.begin(2) would set it
  // to respond to channel 2 notes only.

  MIDI.setHandleNoteOn(MyHandleNoteOn); // This is important!! This command
  // tells the Midi Library which function I want called when a Note ON command
  // is received. in this case it's "MyHandleNoteOn".
}

void loop()
{
  MIDI.read(); // Continually check what Midi Commands have been received.
}